

Spray Foam Attic Insulation: Benefits, Pros & Cons, Cost and Is It Worth It?
|
✅ Quick Answer: Is Spray Foam Attic Insulation Worth It? Yes — for most homeowners, spray foam attic insulation delivers a measurable return on investment. The DOE estimates the attic is responsible for 25–30% of a home's total heat loss, and spray foam addresses this more completely than any other insulation type by combining thermal resistance, air sealing, and moisture control in a single application. Key facts: • Closed-cell: R-6.0–6.5/inch | Open-cell: R-3.5–3.7/inch • Average energy savings: 15–50% on heating and cooling (DOE data) • Installed cost: $1.50–$3.50/board ft (professional); 1,000 sq ft attic: $3,000–$10,000 • Payback period: 3–10 years depending on climate zone and existing insulation • Lifespan: Life of structure — no replacement needed • Best for: Unvented (hot roof) attics, air sealing, cold climates • May not be worth it: Vented attics with adequate existing insulation depth |
Spray foam attic insulation is the highest-performing insulation option available for attic applications — but it is also the most expensive. This guide answers every question homeowners actually search for: the proven benefits backed by data, the honest downsides, what it costs in 2026, open cell vs closed cell for attics specifically, and a clear verdict on whether it is worth it for your situation.

9 Proven Benefits of Spray Foam Attic Insulation
Unlike traditional insulation types, spray foam provides multiple simultaneous performance benefits that make it uniquely effective in attic applications. These are not marketing claims — each is supported by data from the Department of Energy, Oak Ridge National Laboratory, and building science research.

1. Highest Thermal Resistance Per Inch
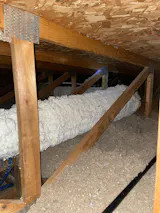
Closed-cell spray foam achieves R-6.0 to R-6.5 per inch — the highest R-value of any commercially available insulation material. Open-cell foam delivers R-3.5 to R-3.7 per inch. By comparison, fiberglass batts achieve R-2.9 to R-3.8, and blown-in cellulose R-3.2 to R-3.8. In an attic where code requires R-49 to R-60 (Climate Zones 5–8), closed-cell foam reaches the target in 7.5–9 inches vs 13–18 inches of fiberglass or cellulose.
2. Simultaneous Air Sealing — The Hidden Performance Driver
The most underappreciated benefit of spray foam is not its R-value — it is air sealing. The Department of Energy estimates that 25–40% of conditioned air loss in a typical home occurs through air infiltration: gaps around pipes, wires, framing connections, and attic hatches. Fiberglass batts and blown-in cellulose do not seal air. Spray foam does both in a single application.
Oak Ridge National Laboratory studies found that spray foam attics outperform fiberglass attics by 40% more than their R-value difference alone would predict — specifically because of this air sealing effect. Two insulation products with identical R-values perform very differently when one seals air and the other does not.
3. Eliminates Thermal Bridging Through Rafters
When applied to the roof deck (unvented attic application), spray foam covers the rafters themselves — eliminating the thermal bridging pathway through the wood framing. Wood framing has an R-value of approximately R-1.25 per inch — significantly lower than the insulation between it. Covering the rafters with foam eliminates this weak point. Batts or blown-in insulation applied between rafters leave the framing exposed as thermal bridges.
4. Moisture and Vapor Control
Closed-cell spray foam at 2+ inches achieves vapor permeance below 1 perm — meeting IRC Class II vapor retarder requirements. This is critical for hot roof (unvented attic) assemblies where the roof deck is vulnerable to condensation. Open-cell foam does not provide vapor control and requires careful moisture management in unvented attic designs, particularly in cold climates.
5. Eliminates Ice Dams in Cold Climates
Ice dams form when heat escaping from the living space melts snow on the roof, which then refreezes at the cold eaves. Spray foam eliminates the heat escape pathway that causes this cycle. Homes in cold climates (Zone 5–8) that convert to spray foam unvented attics consistently eliminate recurring ice dam problems — a benefit that traditional insulation upgrades cannot fully achieve because they do not address air leakage at the attic floor.
6. Permanent Installation — No Settling or Sagging
Spray foam bonds directly to the substrate and does not settle, compact, or sag over time. Fiberglass batts in attics, particularly in vented attics exposed to humidity cycling, commonly lose 20–30% of their installed R-value within 10–15 years due to settling and moisture absorption. Blown-in cellulose settles 15–20% in the first year. Spray foam maintains its installed R-value for the life of the structure.
7. Deters Pest Entry
Spray foam fills the micro-gaps around pipes, wires, and framing that provide pest entry points into attic spaces. Rodents and insects commonly enter homes through the attic floor assembly via utility penetrations — gaps that are invisible to the naked eye but accessible to pests. Foam sealing these pathways provides meaningful pest deterrence as a secondary benefit.
8. Reduced HVAC Load and Equipment Sizing
A properly air-sealed and insulated attic can reduce peak HVAC demand by 25–40%, which in some cases allows homeowners replacing equipment to install smaller, less expensive systems. The Manual J HVAC load calculation used by engineers accounts for insulation level and air leakage — improved envelope performance directly reduces the required system size.
9. Can Increase Home Value
RESNET energy ratings and HERS scores are increasingly relevant in home sales. An attic spray foam upgrade that reduces a home's HERS index by 10–20 points translates to measurable market value — particularly in states with mandatory energy disclosure requirements. The 'blower door test' results that accompany home sales in many markets directly reflect the air sealing provided by spray foam.
Spray Foam Attic Insulation: Honest Pros and Cons
Spray foam attic insulation has clear advantages but also real limitations. A balanced assessment matters more than promotional content — the wrong choice wastes money or creates building science problems.
|
PROS |
CONS |
|
Highest R-value per inch available (R-6.5 closed-cell) |
Most expensive insulation — 3–5× cost of fiberglass or cellulose |
|
Air seals and insulates simultaneously — no separate step |
Professional installation required for most attic applications |
|
Acts as vapor barrier (closed-cell, 2"+) |
Professional spray foam can off-gas isocyanates — vacate for 24 hrs |
|
Permanent — no settling, sagging, or degradation |
Cannot easily inspect or access roof deck once foam is applied |
|
Eliminates ice dams in cold climates |
Open-cell requires separate vapor retarder in cold climates |
|
Reduces HVAC system sizing requirements |
Spray foam on roof deck can complicate future re-roofing work |
|
Pest and draft elimination |
Some older formulas used HFC blowing agents with high GWP |
|
Lifespan = life of structure |
Not suitable for vented attics with adequate existing insulation |
|
⚠️ When Spray Foam Attic Insulation Is NOT Worth It • Vented attic with adequate existing insulation (R-38+): Adding more insulation offers diminishing returns. Air sealing the attic floor penetrations + adding blown-in to reach code may deliver better ROI than a full spray foam conversion. • Mild climates (Zone 1–2, e.g. Florida, Hawaii): Heating loads are small; the premium cost of spray foam may not be recovered within a reasonable payback period. • Roof deck with existing moisture or rot: Spray foam seals in problems. Any moisture-related issues must be resolved before applying foam to a roof deck. • Budget-limited projects where code compliance can be achieved with blown-in: R-60 blown-in cellulose costs approximately 20% of R-49 closed-cell spray foam for the same attic area. |
Is Spray Foam Attic Insulation Worth It? (Honest Verdict)
The 'worth it' question is the most-searched intent cluster for this topic — and it requires a direct, data-driven answer rather than promotional copy.
Worth It: Unvented (Hot Roof) Attic Conversions in Cold Climates
Spray foam is the only code-compliant insulation for unvented attic assemblies (IRC Section R806.5). If you want to bring your HVAC equipment into conditioned space, eliminate ice dams, or convert a vented attic to conditioned storage or living space, spray foam is not optional — it is the correct technical solution. In Climate Zones 5–8, the energy savings and ice dam elimination typically justify the cost within 5–7 years.
Worth It: Air Sealing in Older Homes (Pre-1980 Construction)
Older homes have dramatically more air leakage than modern construction. A blower door test on a pre-1980 home typically shows 12–20 air changes per hour (ACH50) vs 3–5 for modern construction. Spray foam applied to the attic floor penetrations — pipes, wires, chimneys, attic hatches — can reduce this by 30–50% on its own. For these homes, the air sealing benefit alone often justifies the cost even before accounting for thermal resistance.
May Not Be Worth It: Vented Attics in Mild Climates
In Climate Zones 1–3 (FL, AZ, TX south, GA) with vented attics and existing insulation, the incremental benefit of upgrading from R-30 blown-in to spray foam is modest. The payback calculation often shows 15–20 years — beyond the typical homeowner's planning horizon. In these cases, topping up blown-in to R-60 and sealing the attic hatch is likely the better investment.

Payback Calculator Framework
|
Scenario |
Upfront Cost (1,000 sq ft) |
Est. Annual Savings |
Payback Period |
|
Closed-cell unvented attic, Zone 6 (cold) |
$5,000–$8,000 |
$400–$800/year |
6–12 years |
|
Open-cell unvented attic, Zone 5 |
$2,500–$4,000 |
$300–$600/year |
5–10 years |
|
Air sealing only (foam cans + spot work) |
$200–$600 |
$200–$400/year |
1–2 years |
|
Closed-cell unvented attic, Zone 2 (warm) |
$5,000–$8,000 |
$150–$300/year |
17–35 years |
|
Blown-in cellulose to R-60 (comparison) |
$600–$1,500 |
$150–$400/year |
2–5 years |
Use the DOE's Home Energy Saver tool (hes.lbl.gov) or a BPI-certified energy auditor to get a project-specific ROI calculation before committing to spray foam attic insulation. A blower door test ($250–$500) will identify how much air sealing benefit your specific home can achieve.
Vented vs Unvented Attic: Which Approach Is Right for Spray Foam?
The most important technical decision in attic spray foam is whether to treat the attic floor (vented attic) or the roof deck (unvented/hot roof attic). These are fundamentally different building science strategies with different costs, benefits, and code requirements.
|
Factor |
Vented Attic (Foam on Floor) |
Unvented Hot Roof (Foam on Deck) |
|
Foam location |
Attic floor + all penetrations |
Underside of roof deck + rafters |
|
Foam type |
Closed or open cell acceptable |
Closed-cell required (IRC R806.5) |
|
Required thickness (Zone 5) |
Match existing + air seal penetrations |
6" closed-cell minimum for R-38 |
|
HVAC in attic |
No — stays in unconditioned space |
Yes — HVAC in conditioned space |
|
Ice dam elimination |
Partial (air sealing helps) |
Complete (no heat escape to roof) |
|
Cost (1,000 sq ft) |
Lower — partial coverage |
Higher — full deck coverage |
|
Code compliance |
Straightforward |
IRC R806.5 detailed requirements |
|
Best for |
Existing vented attic upgrades |
New construction; ice dam elimination; HVAC relocation |
|
💡 The Humidity Problem: Why Attic Spray Foam Sometimes Causes Moisture Issues A common search query: 'high humidity in spray foam attic' — this reveals a real problem. Cause: When open-cell foam is applied to a roof deck in a cold climate WITHOUT a separate vapor retarder, the permeable foam allows indoor moisture vapor to migrate into the foam, condense on the cold roof deck, and cause wood rot and mold.
Solution: In Climate Zones 5–8, always use closed-cell foam on roof decks (acts as vapor retarder at 2"+) OR use open-cell foam with an approved vapor retarder product sprayed over the foam surface. Never apply open-cell foam alone to a cold-climate unvented roof deck.
IRC Section R806.5 specifies the minimum closed-cell foam thickness required by climate zone for code-compliant unvented attic assemblies. |
Open Cell vs Closed Cell Spray Foam for Attics: Which to Choose?
|
Factor |
Open-Cell (for Attics) |
Closed-Cell (for Attics) |
|
R-value per inch |
R-3.5–3.7 |
R-6.0–6.5 |
|
Vapor retarder |
No |
Yes (at 2"+) |
|
Unvented attic (cold climate) |
❌ Not code-compliant alone |
✅ Required by IRC R806.5 |
|
Unvented attic (warm climate) |
✅ Acceptable |
✅ Preferred |
|
Vented attic floor treatment |
✅ Suitable |
✅ Suitable |
|
Attic floor air sealing only |
✅ Acceptable |
✅ Better |
|
Cost per board foot |
$0.25–$0.50 |
$1.00–$2.00 |
|
Sound dampening |
Better |
Lower |
|
DIY format availability |
Yes (kits) |
Yes (cans + kits) |
The choice is largely determined by code and climate. In Climate Zones 5–8, closed-cell is required for unvented roof deck applications. In Zones 1–4 with unvented designs, both may be code-compliant — consult local building department. For vented attic floor applications in any climate, open-cell foam is a cost-effective choice if vapor management is not a concern.
Spray Foam Attic Insulation Cost: 2026 Complete Guide
Cost is the most-searched secondary intent for this topic — nearly 2,500 impressions across cost-related queries, all landing deep on page 4–6. Adding real cost data addresses this cluster directly and improves content depth.
|
Project |
Attic Size |
Foam Type |
DIY Material |
Pro Installed |
Notes |
|
Unvented roof deck (Zone 5–6) |
1,000 sq ft |
Closed-cell (6") |
~$3,600–$7,200 |
$6,000–$12,000 |
6 inches required for IRC R806.5 |
|
Unvented roof deck (Zone 3–4) |
1,000 sq ft |
Closed-cell (3.5") |
~$2,100–$4,200 |
$3,500–$7,000 |
3.5 inches minimum code |
|
Vented attic floor (top-up) |
1,000 sq ft |
Open-cell (4") |
~$600–$1,200 |
$1,500–$3,000 |
Plus air sealing penetrations |
|
Air sealing only (no added R) |
1,000 sq ft |
Closed-cell (spot) |
$150–$500 |
$400–$1,200 |
Highest ROI project |
|
Hybrid: 2" CC + open-cell fill |
1,000 sq ft |
Both types |
~$1,800–$3,600 |
$4,000–$8,000 |
Code-compliant cold climate option |
|
Cost Factor |
Typical Range |
Impact on Total |
|
Closed-cell material (per board ft) |
$0.50–$1.00 (DIY) / $1.00–$2.00 (pro) |
Dominant cost driver |
|
Open-cell material (per board ft) |
$0.25–$0.50 (DIY) / $0.44–$0.65 (pro) |
Lower cost option |
|
Labor (professional) |
$0.50–$1.50 per board ft additional |
Adds 50–100% over material |
|
Access equipment (scaffolding) |
$200–$800 per project |
Higher for cathedral ceilings |
|
Removal of existing insulation |
$0.50–$2.00 per sq ft |
Required for some deck applications |
|
Fire thermal barrier (intumescent paint) |
$0.50–$1.50 per sq ft |
Required in some occupancies |
Can You DIY Spray Foam Attic Insulation?
The DIY feasibility depends on the application type. Attic floor air sealing and spot applications are excellent DIY projects. Full roof deck spray foam is a professional job for most homeowners.
|
Application |
DIY-Friendly? |
Why |
Products |
|
Air sealing penetrations (pipes, wires) |
✅ Yes — Highest ROI |
Spray cans, easy access |
Kraken Bond FastCoat cans |
|
Attic hatch insulation and sealing |
✅ Yes |
Simple access, small area |
Rigid foam boards + foam can |
|
Rim joists in attic |
✅ Yes |
Accessible, small area |
Cans or 2-component kit |
|
Attic floor spot insulation |
✅ Yes |
Open access, small quantities |
2-component DIY kit |
|
Full roof deck (unvented conversion) |
⚠️ Challenging |
PPE, spray technique, thickness control |
Professional recommended |
|
Cathedral ceiling application |
❌ Not recommended |
Confined access, scaffolding, thickness critical |
Professional only |
For DIY attic air sealing — the highest-ROI application — closed-cell spray foam cans are the right tool. One can of Kraken Bond FastCoat (27.1 oz, Class A fire-rated) handles approximately 25 board feet at 1-inch depth. A typical attic floor air sealing project uses 3–8 cans and can be completed in a half-day.
Required PPE for any spray foam application: full-face respirator with organic vapor + P100 cartridges, nitrile gloves, and full coverall. Do not use an N95 dust mask — isocyanate compounds are respiratory sensitizers that can cause permanent lung damage with inadequate protection.
How to Prepare Your Attic for Spray Foam Insulation
Proper preparation is critical for spray foam adhesion, performance, and safety. Skipping preparation steps is the most common cause of spray foam failures.
1. Step 1 — Inspect for moisture and pest issues
Check for roof leaks, condensation staining, active mold, or signs of pest activity. Spray foam seals in problems — any moisture or pest issues must be resolved before application. Check wood moisture content with a meter; it should be below 19%.
2. Step 2 — Remove existing degraded insulation (if needed)
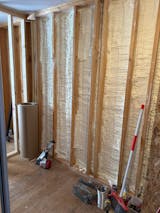
Fallen or wet fiberglass batts on the attic floor should be removed before spray foam application. Existing blown-in insulation on the attic floor may remain for a vented attic top-up. For roof deck applications, existing batts between rafters must be removed.
3. Step 3 — Seal the attic space and protect surfaces
Cover all vents, recessed lights, and electrical boxes that will not be foamed. Mask any surfaces you do not want foam to contact — spray foam is extremely difficult to remove from surfaces once cured. Cover the attic hatch opening.
4. Step 4 — Verify temperature and humidity conditions
Spray foam requires substrate temperatures between 50°F and 90°F for proper expansion and adhesion. Relative humidity above 80% can cause adhesion problems with some formulas. Check conditions before starting; do not apply in extreme cold or heat.
5. Step 5 — Set up ventilation
Establish cross-ventilation through the attic space before starting — at minimum, two open vents on opposite ends. For enclosed attic spaces, use a portable fan to maintain airflow during application. Isocyanate off-gassing during application requires ventilation rates of at least 0.5 air changes per minute.
6. Step 6 — Apply in correct order
For attic floor applications: seal penetrations first with spray foam, then apply insulation from far corners toward the access hatch. For roof deck applications: begin at ridgeline, work toward eaves. Apply in multiple passes if achieving depths greater than 2 inches — single thick passes can cause exothermic heating problems with some formulas.
Frequently Asked Questions: Spray Foam Attic Insulation
Is spray foam attic insulation worth it?
Yes, in most cases — particularly for cold climate homes (Zone 5–8), unvented attic conversions, older homes with high air leakage, and homes with recurrent ice dam problems. The DOE estimates 25–30% of home heat loss occurs through the attic. Spray foam addresses both the thermal resistance and air sealing gaps simultaneously, outperforming alternative insulation by 40%+ in real-world conditions per Oak Ridge National Laboratory research. Payback: 5–12 years in cold climates; longer in mild climates.
What are the benefits of spray foam insulation in an attic?
The 9 proven benefits are: (1) highest R-value per inch available, (2) simultaneous air sealing, (3) elimination of thermal bridging through rafters, (4) vapor control (closed-cell), (5) elimination of ice dams, (6) permanent installation without settling, (7) pest deterrence, (8) reduced HVAC sizing requirements, and (9) increased home value via improved energy ratings.
What are the downsides of spray foam in an attic?
The main downsides are: high upfront cost ($3,000–$12,000 for a full attic); professional installation typically required; 24-hour vacate period after application; complicates future roof deck inspection or replacement; open-cell foam in cold climates requires a separate vapor retarder; and the high GWP of some HFC blowing agents (newer HFO-blown products have lower impact).
Is spray foaming your attic a good idea?
It depends on your climate zone, attic type, and existing insulation. Best scenario: cold climate (Zone 5–8), converting to unvented attic, older home with high air leakage, or HVAC equipment in the attic. Less compelling: mild climate (Zone 1–2), vented attic with existing adequate insulation, or budget-limited projects where blown-in cellulose to R-60 + air sealing delivers comparable savings at lower cost.
Should I replace my attic insulation with spray foam?
Not necessarily. If your existing insulation is dry, undamaged, and at or near code depth (R-38 to R-60 depending on zone), the marginal benefit of replacing it with spray foam may not justify the cost. The highest-ROI approach for most existing homes is: (1) air seal all attic floor penetrations with spray foam cans, (2) add blown-in to bring total R-value to code, and (3) insulate and seal the attic hatch. This can be done for $500–$2,000 with payback under 3 years.
What does spray foam attic insulation cost?
Professional installation of closed-cell spray foam on an attic roof deck ranges from $1.50–$3.50 per board foot installed. For a 1,000 sq ft attic requiring 6 inches (R-38 per IRC Zone 5), total installed cost is typically $9,000–$21,000. Open-cell foam runs $0.44–$0.65 per board foot installed. DIY air sealing with spray foam cans costs $150–$600 for most attics and delivers 30–50% of the energy benefits at 5–10% of the cost.
How much does it cost to spray foam an attic?
Cost varies by foam type, thickness, attic size, and access complexity. Typical ranges: closed-cell unvented roof deck on 1,000 sq ft attic = $6,000–$12,000 installed; open-cell unvented = $2,500–$5,000; vented attic floor treatment with open-cell = $1,500–$3,000; DIY air sealing only = $200–$600.
Can I spray foam my attic myself?
Yes, for air sealing and partial applications. Consumer-format closed-cell spray foam cans and two-component kits are suitable for attic floor penetrations, rim joists, and attic hatches — the highest-ROI applications. Full roof deck spray foam typically requires professional equipment for consistent thickness, proper PPE, and code compliance verification. If DIY, use a full-face respirator with organic vapor + P100 cartridges — not just an N95 mask.
How do you prepare your attic for spray foam insulation?
Eight preparation steps: (1) inspect for moisture and pest issues; (2) address any roof leaks or mold before foaming; (3) remove degraded existing insulation; (4) cover vents, light fixtures, and surfaces not being foamed; (5) verify substrate temperature between 50–90°F; (6) verify wood moisture content below 19%; (7) establish cross-ventilation; (8) apply penetration sealing before broad coverage. Skipping preparation — especially moisture checking — is the primary cause of spray foam attic failures.
2 comments
Share this


Author : Krakenbond Team
Let customers speak for us

Incredible quality and very easy to use. I highly recommend this product.

The quality of the product is very good, the sealant stays white after drying out.
Great product, easy to use

The quality of this foam gun is excellent. The design is well refined and fits in the hand extremely well. The trigger works phenomenally. After several jobs this gun continues to impress.

Best caulk ove used in years. 144 tubes used so far and after 3 years it is solid and reliable.
Foam was easy to use and insulated the duct pipe well. Odor dissipated faster than expected.
It works great didn’t go as far as I thought
WORKED GREAT! I have used larger spray foam systems before, so I have some experience. Followed the instructions and had no issues. Super easy. Just take your time and just lightly pull the trigger and you should have great results. All the equipment and cans worked perfectly and the firm is good quality.
Great product!
Like it
Great product, easy to use.
we used it in our new bathroom. Easy to use works well!
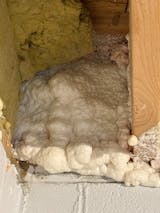
I used the Kraken FastCoat Fire Rated spray foam insulation to seal rim joists in our basement.
The kit ordered came with everything I needed to get started. The spray foam, cleaner, and gun. Application was seamless. Following the directions provided, it foam went on evenly and adhered to not only the wood in the joists, but also the metal ducts present in some of the joist bays.
I was actually pretty impressed with it, which is saying a lot for me. The application I used it for, sealing joist bays to be air tight, worked extremely well. Ordering another case of it to use to air seal my attic.
Used it to insulate crawl space beneath the sun room. Excellent. Easy to use. No mess. Just wish there were more in the bottles.
When remodeling an existing full foam cavity fill project. This product is a geart solution for replacing areas of the existing that had to be removed during the remodel especialy when it isn't cost effective to have a commercial spray foam contractor out for touchup. Make sure to have enough cans to get it done. Touching up a 2' area of a full fill 2x10 floor joist will take about 1½ cans.


Where do I find the map this information refers to?
Thank you
How do I spray 45 deg angle attic without wasting part of the can. Do you sell an angled adapter to attach to the gun.?
Leave a comment