How to Insulate a California Corner | Spray Foam DIY Guide

California corners are one of the most energy-efficient framing methods in modern home construction — but only when insulated correctly. Leave them bare, and you're handing heat straight to the outdoors through every corner of your house.
This guide covers everything you need to know about how to insulate a California corner: what it is, why it matters, what materials to use, and a complete step-by-step walkthrough using closed-cell spray foam.
What Is a California Corner?
A California corner — also called a "two-stud corner", "L-corner" or "Hollywood corner" — is a wall-framing technique that uses just two studs arranged in an L-shape to form an exterior corner, instead of the traditional three- or four-stud box configuration.
In conventional framing, three studs are nailed tightly together at each corner. This locks out any insulation and creates a solid wood thermal bridge — one of the worst energy leaks in a wood-framed wall. The California corner solves this by positioning one stud to back the drywall and another to back the exterior sheathing, leaving an open cavity between them that can be fully insulated.

California corner benefits at a glance:
- Reduces lumber use by 30–40% per corner vs. traditional framing
- Creates an insulation-accessible cavity at every exterior corner
- Cuts thermal bridging significantly compared to 3-stud corners
- Required or recommended under many advanced framing (OVE) building programs
Note: California corners are sometimes restricted on exterior walls in high-seismic zones. Always verify with your local building department before modifying existing corner framing.
Why Insulating a California Corner Actually Matters
Thermal bridging — heat traveling through solid wood studs instead of insulation — is responsible for up to 30% of heat loss in poorly framed walls. While insulation installed between studs might hit R-13 or R-21, the studs themselves only provide around R-1.25 per inch (2×4 stud = ~R-4; 2×6 = ~R-6). At every traditional corner, you have 3–4 studs stacked with zero insulation — a clear thermal highway from indoors to outdoors.
California corners fix this by replacing that stud stack with an insulated cavity. Here's what proper insulation achieves:
1. Eliminates Thermal Bridging at Corners
Closed-cell spray foam fills the cavity completely, blocking conductive heat transfer through the framing. Each insulated corner adds measurable improvement to your wall assembly's effective R-value.
2. Reduces Heating and Cooling Costs
Sealing corner air leaks and improving thermal resistance can meaningfully reduce energy bills year-round — especially in homes with many exterior corners (think L-shaped layouts, bump-outs, bay windows).
3. Prevents Moisture and Mold
Corners are cold spots where warm indoor air meets cold exterior surfaces, causing condensation. Closed-cell spray foam acts as both an air barrier and a vapor retarder, stopping moisture infiltration before mold and rot take hold.
4. Improves Soundproofing
The dense cell structure of closed-cell foam absorbs sound transmission — useful for corner rooms adjacent to outdoor traffic or neighboring units.

Choosing the Right Insulation for California Corners
Not every insulation material works equally well in tight corner cavities. Here's how the main options compare:
| Insulation Type | R-Value per Inch | Moisture Resistance | Air Sealing | DIY Friendly |
|---|---|---|---|---|
| Closed-Cell Spray Foam | R-6.0–R-7.0 | Excellent | Yes | Yes (canned foam) |
| Open-Cell Spray Foam | R-3.5 | Poor | Partial | Yes (canned foam) |
| Fiberglass Batts | R-2.9–R-3.8 | Poor | No | Yes |
| Mineral Wool Batts | R-3.1–R-3.7 | Good | No | Yes |
| Rigid Foam Board (XPS/Polyiso) | R-4.0–R-6.5 | Good | With tape | Moderate |
For California corners, closed-cell spray foam is the clear winner. The cavity behind a corner stud is narrow, irregular, and hard to reach — spray foam is the only insulation that flows into tight gaps, bonds to the framing, and cures into a rigid air-and-moisture barrier in one step.
Fiberglass batts, while cheap, cannot be stuffed effectively into these tight spaces without voids and compression losses. Voids in fiberglass reduce the effective R-value drastically. Rigid boards require precise cutting and still leave gaps at edges.
Kraken Bond FastCoat Closed-Cell Spray Foam delivers R-5.66 per inch, resists moisture vapor, and cures into a rigid cell structure ideal for corners and other irregular cavities.
Tools and Materials Needed
Before you start, gather the following:
- Closed-cell spray foam (Kraken Bond FastCoat recommended)
- Spray foam gun (for precision application)
- Utility knife or serrated blade (for trimming cured foam)
- Caulk + caulk gun (for hairline cracks before insulating)
- PPE: nitrile gloves, safety goggles, N95 respirator or higher
- Drop cloth or painter's tape (to protect adjacent surfaces)
- Flashlight or work light (corners are dark)
Pro tip: Work in temperatures between 60–80°F (15–27°C) for best foam expansion. Cold temperatures slow curing; extreme heat can cause over-expansion.
How to Insulate a California Corner: Step-by-Step
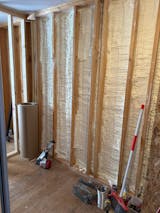
Step 1: Inspect and Prepare the Corner Area
Before applying any insulation, inspect the corner thoroughly:
- Check for moisture. Press a cloth against the wood framing. Any dampness means you have a leak — fix it before insulating or you'll trap moisture inside the wall.
- Look for existing cracks or gaps. Use a flashlight to inspect the full height of the corner cavity.
- Seal hairline cracks with caulk. Apply a bead of paintable caulk along any visible gaps between sheathing and framing, or where the bottom plate meets the subfloor. Let it cure fully before proceeding.
- Clean the surface. Remove dust, loose debris, or old foam residue. Spray foam adheres best to clean, dry wood.
Step 2: Set Up Your Spray Foam Equipment
- Shake the foam can vigorously for 30–45 seconds to mix the chemical components.
- Attach the spray foam gun to the can according to the manufacturer's instructions.
- If using a dispensing gun, prime it with a short test burst into a trash bag to check flow and consistency before starting on the corner.
- Tape off any adjacent drywall, finished surfaces, or electrical boxes you don't want foam on — cured closed-cell foam is difficult to remove without damaging surfaces.
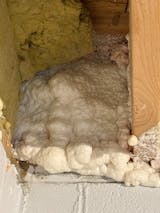
Step 3: Apply Spray Foam to the Corner Cavity
- Position the nozzle at the bottom of the corner cavity and work upward.
- Move the nozzle slowly and steadily — aim for a consistent bead about 1 inch in diameter.
- Fill the corner first, then work outward into the wider cavity.
- Apply foam in passes rather than one thick fill. Closed-cell foam expands 1–2x its applied volume; overfilling causes it to push against drywall and sheathing.
- Leave about 1 inch of headroom per pass to account for expansion before the foam fully cures.
Caution: Avoid spraying directly against vapor barriers, house wrap, or foil facings without checking manufacturer compatibility. Some foam products bond permanently to these surfaces.
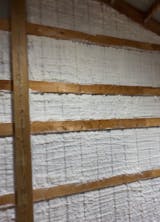
Step 4: Seal Gaps and Confirm Full Coverage
Once the first pass has cured to the touch (typically 10–15 minutes):
- Inspect the cavity with your flashlight for any voids, missed spots, or thin areas.
- Reapply foam to any gaps. Even small uncovered areas create thermal and air leakage pathways.
- For particularly deep or wide cavities, a second pass after the first has cured delivers more consistent coverage than one thick pass.
Step 5: Trim and Final Check
- Allow foam to fully cure for at least 24 hours before installing drywall or finishing.
- Use a serrated utility knife or handsaw to trim any foam that protrudes beyond the face of the framing. A flat trim ensures drywall installs flush.
- Run your hand along the corner from top to bottom. You should feel consistent firmness — no soft spots or hollow areas.
- The corner is ready for drywall, siding, or any subsequent finish work.
Common Mistakes to Avoid
1. Skipping the Moisture Check
This is the most consequential mistake. Sealing wet wood inside a wall cavity accelerates rot, mold, and structural damage. Never insulate over wet framing.
2. Over-Applying Foam in One Pass
Closed-cell foam exerts real pressure as it expands. Overfilling tight cavities can bow sheathing or crack drywall. Apply in controlled layers.
3. Using Open-Cell Foam in Exterior Corners
Open-cell foam is vapor-permeable and absorbs moisture — exactly the wrong behavior for an exposed corner cavity. Only closed-cell foam provides the vapor barrier needed here.
4. Ignoring the Top and Bottom of the Cavity
Air infiltration most commonly occurs where the top plate meets the ceiling and where the bottom plate meets the subfloor. Don't stop your foam application short — seal the full height from sole plate to top plate.
5. Working in Poor Ventilation
Spray foam off-gassing during curing requires adequate ventilation. Open windows, run a fan, and wear respiratory protection throughout application and for at least 30 minutes after.
Benefits of Properly Insulated California Corners
Done right, insulating California corners with closed-cell spray foam delivers long-term dividends:
- Lower energy bills. Sealing corner air leaks and thermal bridges reduces the load on your HVAC system. Consistent thermal performance year-round.
- Moisture control. Closed-cell foam's vapor retarder properties prevent condensation within the wall assembly — the primary cause of mold and wood rot in exterior corners.
- Structural reinforcement. Cured closed-cell foam bonds to surrounding framing and sheathing, adding rigidity to the corner assembly.
- Sound dampening. Dense foam reduces airborne noise transmission — noticeable improvement in rooms with outdoor-facing corners.
- Eco-friendly efficiency. Reducing heat loss directly reduces your home's carbon footprint and energy consumption over the life of the building.
Frequently Asked Questions
What's the difference between a California corner and a traditional 3-stud corner?
A traditional corner uses 3 studs nailed together, leaving no room for insulation. A California corner uses 2 studs in an L-shape, creating an open cavity that can be filled with insulation — reducing thermal bridging and improving energy efficiency.
Can I use fiberglass batts instead of spray foam in a California corner?
You can, but it's not recommended. The narrow, irregular cavity makes it nearly impossible to install batts without voids, and voids dramatically reduce effective R-value. Spray foam fills completely, seals air infiltration, and cures rigid.
How long does spray foam take to cure in a corner cavity?
Surface tack-free time is typically 10–15 minutes. Full cure for drywall or further finishing work takes 24 hours. Don't rush it.
Does insulating California corners require a building permit?
Typically no for repair or retrofit insulation in existing walls. New construction corner framing and insulation may require compliance with local building codes and Title 24 (in California). Check with your local authority.
What R-value should I aim for in a California corner?
For 2×4 wall framing in most US climates, aim for at least R-13 in the cavity. In colder climates or with 2×6 framing, target R-19 to R-21. Closed-cell foam at 2–3 inches in the corner cavity typically delivers R-13 to R-21 depending on cavity depth.
Conclusion
California corners are purpose-built for insulation — but only do their job if you actually fill them. Leaving corner cavities bare means thermal bridging, air infiltration, and moisture risk at every exterior corner of your home.
Closed-cell spray foam is the right tool for the job: it fills irregular cavities completely, seals air and vapor simultaneously, and cures into a rigid barrier that holds its R-value for the life of the building.
Follow the five steps above — inspect, prepare, apply, verify, trim — and your California corners will perform as they were designed to: making your walls tighter, your home more comfortable, and your energy bills lower.
Ready to get started? Kraken Bond FastCoat Closed-Cell Spray Foam is designed for exactly this type of DIY application — precision, reliability, and a Class A fire rating in a can.


Author : Krakenbond Team
Let customers speak for us

Great product, easy to use.
we used it in our new bathroom. Easy to use works well!
I used the Kraken FastCoat Fire Rated spray foam insulation to seal rim joists in our basement.
The kit ordered came with everything I needed to get started. The spray foam, cleaner, and gun. Application was seamless. Following the directions provided, it foam went on evenly and adhered to not only the wood in the joists, but also the metal ducts present in some of the joist bays.
I was actually pretty impressed with it, which is saying a lot for me. The application I used it for, sealing joist bays to be air tight, worked extremely well. Ordering another case of it to use to air seal my attic.
Used it to insulate crawl space beneath the sun room. Excellent. Easy to use. No mess. Just wish there were more in the bottles.
When remodeling an existing full foam cavity fill project. This product is a geart solution for replacing areas of the existing that had to be removed during the remodel especialy when it isn't cost effective to have a commercial spray foam contractor out for touchup. Make sure to have enough cans to get it done. Touching up a 2' area of a full fill 2x10 floor joist will take about 1½ cans.

Great product! Easy to use and hoping it will last a long time. Great service and delivery experience for me.

Great fast option for repairs
great product
Definitely a learning curve in use, but over all great product.
Works great, easy to use and apply. Cans and cleaner very user friendly! tays warmer than previously!
Very easy to use and awesome product. Works very well and no complaints. Used it at home but would def use it at work if the company allowed but they have their own sources.
Easy to apply. Applied a 48 pack to my metal shed in less than an hour.
Great coverage and easy to use!
Was clean installation and delivered as much per ft. as advertised. Im placing another order. Full disclosure, I havent tried other brands, but I was happy. The cleaner works really well as well! I did a 2ft. Swath all the way around the base of my 40x48 shed with 24 cans.
Easy to use, a fraction of the price for professional results, definitely recommend


Leave a comment