

How to Use a Caulk Gun: A Complete Guide For Beginners
Using a caulk gun is an efficient way to seal holes and gaps around your home. As a beginner, it is important to know how to use a caulk gun and how to load a caulk gun. Asides from knowing how to handle a caulk gun, choosing the right caulk for your project will help you get the most out of your caulking project. Constant practice, steady hands, and a consistent pace are tips that can make your caulk project excellent. Cutting the caulk tube at the right angle, typically around 45 degrees, and applying even pressure on the trigger, which may require about 5 to 10 pounds of force, are additional tips for a successful caulk job. With these tips, you can master how to release caulk gun, how to save caulk, and how to caulk hard-to-reach places just like a professional. As a beginner, there are common mistakes that you should avoid when applying caulk in your home, including choosing the wrong caulk, over-applying the caulk, and rushing the application, which can lead to uneven results.

What is a Caulk Gun?
A caulk gun is a t ool for dispensing caulk, sealant, or adhesives. A caulk gun holds the caulk tube in place, making it easy to dispense it effectively. In addition, a caulk gun makes it easy to aim the gap or hole to be sealed and regulate the amount of caulk released.
How to Load & Use a Caulk Gun? Instructions For Beginners
Applying caulk is a straightforward DIY process, but you must know how to use a caulk gun. The following steps will guide you on how to use a caulking gun:
Step 1: Choosing The Right Caulk
The first step in any caulking process is to get the right caulk for the job. There are different types of caulk to choose from for a caulking project, typically ranging in price from $5 to $12 per tube. . The right choice of caulk depends on some significant factors, such as the location and the moisture level of the crack or gap. It's essential to consider the caulk's cure time, with some products drying within 30 minutes, while others may take up to 24 hours to fully cure. Additionally, the caulk-to-gap ratio should be carefully measured, aiming for a smooth bead of caulk approximately 1/8 to 1/4 inch in diameter for optimal sealing.

Different caulks have different properties, such as moisture resistance, which makes them ideal for caulking areas such as bathrooms, tubs, kitchens, etc. On the hand, some caulk offers excellent adhesive properties, with a typical bond strength ranging from 50 to 90 pounds per square inch (psi), making them suitable for concrete caulking. For example, silicone caulks, with a moisture resistance of up to 98%, are good for areas with high humidity, while latex caulk, with a curing time of approximately 24 hours, can seal dry areas effectively. The common types of caulk include the following:
- Silicone Caulk
Silicone caulks are the most widely used type of caulk that offers high water resistance, typically exceeding 98%, excellent adhesive ability, and flexibility. Silicone caulks are ideal for caulking interior and exterior areas because of their response to temperature changes. Check out Krakenbond’s collection of caulks for the best silicone caulk for your bathroom, tubs, windows, and doors.
- Acrylic Latex Caulk
Acrylic latex caulk is a water-based caulk used mainly for indoor projects. It is suitable for caulking dry areas because of its low moisture resistance, typically with a moisture barrier of less than 10%. Acrylic latex caulk is also paintable, allowing you to match your caulking to your decor, and used in sealing drywalls, trim, and baseboards, with a typical drying time of 30 minutes to 1 hour.
- Butyl Rubber Caulk
Butyl rubber caulk is highly adhesive, with a typical bond strength of 100 pounds per square inch (psi), and is commonly used for sealing metals. Butyl rubber caulk is waterproof, with a moisture resistance exceeding 98%, flexible, and has superior elasticity, stretching up to 1000% of its original size, making it suitable for sealing roof joints. In addition, it can withstand extreme temperature changes, ranging from -40°F to 250°F (-40°C to 121°C), and high UV penetration, with UV resistance of up to 20 years or more.
- Polyurethane Caulk
Polyurethane caulk is commonly used for exterior applications due to its durability, often with a lifespan of 10 to 20 years, and flexibility, stretching up to 500% of its original size. Polyurethane caulks adhere well to different surfaces, with a typical bond strength of 75 to 150 pounds per square inch (psi), and can withstand extreme temperature conditions, ranging from -40°F to 200°F (-40°C to 93°C). They also have high water resistance, typically exceeding 90%, and can be used for sealing concrete, wood, and metals, with prices typically ranging from $5 to $15 per tube.
Step 2: Preparing Your Work Area
After choosing the right caulk, the next step is to prepare the area you want to apply the caulk. Preparing the work area ensures that nothing hinders the new caulk from adhering properly. You can prepare the work area for caulking with the following steps:

- Remove Debris or Old Caulk: This is done because the new caulk does not adhere well to the existing caulk. You can use a putty knife or caulk removal tool.
- Remove Debris and Dust : Use a clean cloth dipped in alcohol, bleach, or hot water to clean the surface of the work area to remove dust. Then, dry the work area completely with a clean cloth.
- Protect The Surrounding Areas : Use painter's tape to cover areas you do not want to apply caulk. To do this, apply the tape above and below the area to be caulked.
Step 3: Loading The Caulk Gun
Loading a caulk gun is a necessary step when learning how to work a caulk gun. Here is a step-by-step guide on how to load a caulking gun for the first time:

- Press The Release Trigger On The Handle : The release trigger is a small metal at the back of the caulk gun with a metal spring attached to it. Press it down to loosen the plunger (rod) that runs within the caulk gun, typically requiring a force of about 5 to 10 pounds of pressure.
- Pull The Plunger : While pressing the release trigger, pull the plunger all the way back, extending it to create space for the caulk tube, a distance of approximately 6 to 8 inches.
- Place The Caulk Tube Into The Caulk Gun : To know how to put the caulk in the gun, place the caulk tube into the caulk gun with the tip of the tube coming out of the gun. Then push the plunger back until it touches the caulk tube's base, which typically involves exerting a force of about 10 to 15 pounds.
Step 4: Cutting The Tip Of The Caulk Tube
The next step is to cut the tip of the caulk tube. Next, use scissors to cut the nozzle at an angle of 45 degrees, typically leaving a gap of approximately 1/8 to 1/4 inch. Cut the nozzle close to the tube to seal a large crack or gap, or trim it closer to the tip of the nozzle if you want to apply a small bead of caulk, typically leaving about 1/16 inch. Then, use a pin or utility knife to break the tube seal, typically requiring a slight puncture force of about 1 to 2 pounds of pressure.
Step 5: Applying Caulk
Applying caulk requires that you learn how to release the caulk gun. Here is how to apply caulk effectively:

- Hold The Caulk Gun At 45 Degrees: Before you start applying the caulk, hold the caulk gun at 45 degrees and point it toward the gap.
- Apply The Caulk : Press the caulk gun's trigger to release the caulk, and move the gun steadily in one direction as you apply it. As you squeeze the trigger, the caulk comes out of the nozzle.
- Move Steadily Across The Gap : Move the caulk gun steadily across the gap length to fill it evenly. The crack will not be evenly filled if you move the caulk too fast. Also, the caulk becomes clumpy if you move too slowly. In addition, fill any missed spot to make and try to evenly distribute the caulk as much as possible.
Step 6: Smoothing The Caulk
After applying the caulk, smoothen the caulk to make the distribution even. This process is called tooling. Here is how to smoothen the caulk:

- Wear a disposable glove or cover your hand with a dry cloth.
- Use one finger to run through the caulk while applying little pressure.
Step 7: Cleaning Up
This is the last step, and it is necessary to make your work look neat. Keeping your caulk job clean is as simple as the following steps:
- Clean Excess Caulk: Clean excess around the work area and nozzle with a clean cloth. Dip the clean cloth in alcohol or silicone removal if you use silicone caulk.

- Remove the Painter’s Tape
If you used painter’s tape, remove the tape and clean the area with a dry cloth.
Tips For Using A Caulk Gun Like A Pro
An excellent caulking job goes beyond getting the right caulk and knowing how to open caulk. As a Pro or DIY enthusiast, handling a caulk gun the right way is an essential skill. Here are tips for using a caulk gun like a Pro:

- Practice Makes Perfect:
Before you start your caulking job, master how to use a caulking gun by practicing. Practice on a piece of wood with an empty or filled caulk tube. This will help you get familiar with how to control the flow of caulk, how to store open caulk tubes, how to stop caulk from coming out gun, etc.
- Use The Right Amount of Pressure
Do not use too much pressure on the trigger when applying caulk. It can lead to uneven application and a messy caulk job. Instead, use a moderate and consistent amount of force to control the flow of the caulk along the gap or crack.
- Don't Rush
Maintain a consistent pace as you apply the caulk. This helps to make your caulk job look professional and clean.
- Keep A Steady Hand
Always keep a steady hand and apply the caulk in one continuous motion. Keeping a steady hand is also applicable when tooling; you can smear the caulk if you apply too much pressure.
- Release Pressure At The End Of A Gap
When you get to the end of a crack, release the trigger. After releasing the trigger, pull the caulk gun away to stop excess caulk from coming out.
Common Mistakes To Avoid
Simple mistakes like spilling caulk on the floor can happen to the best of us. However, there are common mistakes that should be avoided in order to produce an excellent job. These common mistakes include the following:

- Using The Wrong Type Of Caulk
The disadvantages of using the wrong caulk are poor performance and durability. For example, using latex caulk for exterior applications is wrong because it cannot certain weather conditions.
- Cutting The Tip Of The Caulk Tube Too Large Or Too Small
Cutting the tip of the caulk tube wrongly will affect the control of the caulk. As a result, it can lead to excessive or inadequate caulk. Also, cutting the nozzle at a different angle other than 45 degrees can lead to uneven distribution of the caulk.
- Applying Too Much Or Too Little Caulk
Applying too much caulk is a common mistake that can lead to poor caulking jobs. It makes the job messy and difficult to smooth. Always make sure to apply a small bead of caulk, as it is better to add more caulk than over-applying it.
- Applying Caulk Too Quickly Or Unevenly
Rushing the caulking process is another common mistake that should be entirely avoided. Applying caulk requires patience because rushing the process will lead to a messy job. When applying caulk, take your time, maintain a steady pace, and pay attention to details.
- Not Smoothing The Caulk Properly
Tooling is an important aspect of applying caulk, and it must be addressed. The caulk job looks untidy and unprofessional when you do not smoothen it after application.
How to Use Caulk Without Gun?
Without a doubt, using a caulk gun makes your caulking job easier and neat. However, learning how to use a caulk without gun will come in handy when you want to seal a small area or a caulk gun is out of reach. There are different ways to use caulk without a gun, depending on the type of caulk used.
Silicone caulks are used for different purposes, especially in areas prone to water, like bathrooms. They are sensitive to the skin, so it is important to wear vinyl gloves during application. Here is how to use a silicone sealant without gun:
- Choose a silicone caulk that matches the color of the affected area, such as a wall, window, door, etc
- Cut the tip/nozzle of the caulk tube at an angle of 45 degrees.
- After puncturing the seal, squeeze the tube to move the caulk close to the tip.
- Point the tip towards the gap and apply the caulk while moving at a steady pace.
- Wear vinyl gloves and dip your hand in water before you start tooling.
- Carefully reapply the caulk on missed spots.
Frequently Asked Questions (FAQS)
Can You Use Caulk Without A Gun?
Yes, you can use a caulk without a gun. However, caulk guns make the job neat and easier. Caulk guns help you achieve a smooth job by making it easier to aim and keep a steady pressure.
Can I Reuse A Caulk Tube?
Caulk tubes are usually meant for a single application. Nevertheless, there are techniques for resuing caulk tubes.
How Long Does Caulk Take To Dry?
Typically, it would take from 30 mins - 24 hours for the caulk to dry, depending on the type of caulk. For example, latex caulk would 30 mins to 1 hour to dry, while silicone caulk can take up to 24 hours. Therefore, it is advisable to allow the caulk to properly for at least 24 hours for complications.
Can I Paint Over Caulk?
Not all types of caulk are paintable. For example, latex caulk is paintable, which makes them suitable for interior applications, while silicone caulks are not paintable.
Conclusion
Using a caulk gun is an efficient way to seal holes and gaps around your home. As a beginner, it is important to know how to use caulk gun and how to load a caulk gun. Asides from knowing how to handle a caulk gun, choosing the right caulk for your project will help you get the most out of your caulking project.
Constant practice, steady hands, and a consistent pace are tips that can make your caulk project excellent. Cutting the caulk tube at the right angle and applying even pressure on the trigger are additional tips for a successful caulk job. With these tips, you can master how to release caulk gun, how to save caulk, and how to caulk hard-to-reach places just like a professional.
As a beginner, there are common mistakes that you should be avoided when applying caulk in your home. These mistakes include choosing the wrong caulk, over-applying the caulk, and rushing the application.
Share this
Popular posts


Author: Krakenbond Team
Found this helpful? Make Kraken Bond your go-to source on Google
If our content has been useful, you can tell Google to show more of it when you search. Click below, then check the box next to "KrakenBond.net" on the page that opens. It takes about five seconds.
Add Kraken Bond on GoogleYou'll need to be signed in to your Google account. One click, then tick the box next to KrakenBond.net
Let customers speak for us

Haven’t used it yet. But been reading instructions and seems easy enough. We will see.
It was delivered in a reasonable amount of time and packaging was great.

Was easier to apply than I thought. Cleaning was very easy with the added cleaner cans.
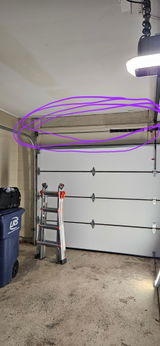
Used this to insulate the space between the ceiling and the wall right above a two-car garage door. It worked exactly as described, and I was surprised how easy it was! It took more time to move the ladder around and get stuff out of the way in the garage than it did to actually spray. Tips: Shake the can longer than 2 minutes. The better you shake the better the product comes out. Clean the nozzle and gun with the cleaner frequently and don't let it sit between cans. An actual respirator is highly recommended! Wear all the protective gear it comes with, especially the glasses. Take frequent open air breaks as you go. Overall I am impressed for a product I bought from a Facebook ad.
Kit is great, has everything you need!

The best pond foam out there, just order another case.
Incredible quality and very easy to use. I highly recommend this product.

The quality of the product is very good, the sealant stays white after drying out.
Great product, easy to use

The quality of this foam gun is excellent. The design is well refined and fits in the hand extremely well. The trigger works phenomenally. After several jobs this gun continues to impress.

Best caulk ove used in years. 144 tubes used so far and after 3 years it is solid and reliable.
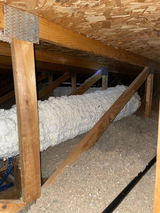
Foam was easy to use and insulated the duct pipe well. Odor dissipated faster than expected.
It works great didn’t go as far as I thought
WORKED GREAT! I have used larger spray foam systems before, so I have some experience. Followed the instructions and had no issues. Super easy. Just take your time and just lightly pull the trigger and you should have great results. All the equipment and cans worked perfectly and the firm is good quality.
Great product!
Like it


Leave a comment